

Posing the body
Introduction:
Finally, we get to the fun part: sketching a posed body for our future doll base! It's also the hardest part, though, so we'll have to plan everything carefully.A simple body lay-out:
Keeping all proportions right becomes harder when we want to draw a posed figure. Imagine that you spent ages on your sketch... and just when you're all done, you notice that the arms are too short! Or... the pose looks dorky! Now that would suck.So, before you start drawing a detailed body, you need to plan your pose and proportions. And we're going to that by drawing... a stick-figure! Well, don't laugh.
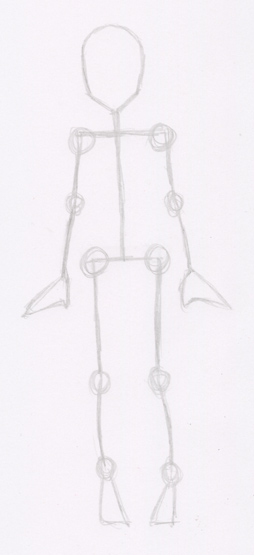
Here's the stick-figure we are going to use (still unposed). As you can see, I drew little horizontal lines for the shoulders and hips. This is important, because otherwise we wouldn't be able to attach the limbs properly. Also, I drew little circles to indicate joints. The hands and feet aren't too important at this stage, so I drew some blobs instead.
Posing your stick-figure:
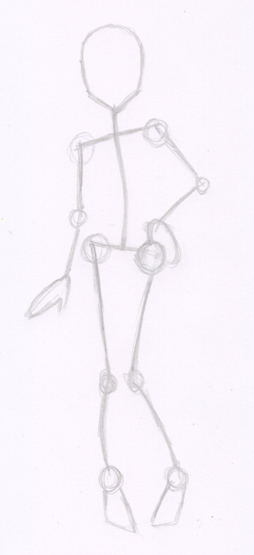
Now, the above stick-figure looks really boring, so let's loosen up that pose a bit! An easy way to do this, is to have the figure lean more on one leg that the other.When you shift your weight to one leg, the pelvis will go up on that side (and drop down on the other). But here comes the important part: if your pelvis tilts, your shoulders will tilt the opposite way.
If you keep this in mind, your poses will become much more dynamic!
But, even with a stick-figure, coming up with good poses can be tricky. The only thing you can do about it, is to study lots and lots of poses! Study photographs, or study yourself in the mirror. Maybe have a friend pose for you while you sketch. Practice makes perfect!
Blocking in the body:
When you're happy with your stick-figure, it's time to fill in the masses of the body. You can use simple shapes for this, like cylinders or oval-like shapes. If you have a hard time getting all the shapes right, look in the mirror or use picture reference.Keep messing with it until you're happy with the overall body shape.

Finalizing the sketch:
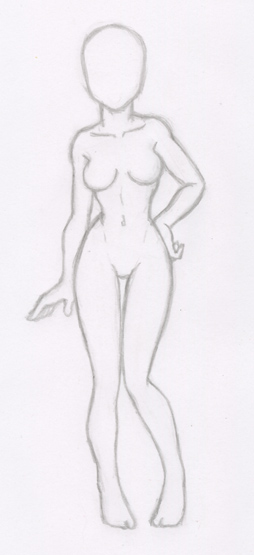
After blocking in the body, it's time to clean up your sketch. Now you can refine the outlines a bit and add some anatomical details if you like. Again, if you have any trouble doing this, study real bodies!For my sketch, I left out the face, because the focus is on the body here. As you can see, the proportions are not quite as realistic as in the previous chapter. I've exaggerated on the curves a lot and the head is too big.
But, that doesn't mean I've already thrown our proportion guidelines out of the window! Compare the sketches and you'll notice that I've kept the relative lenghts of the torso and limbs pretty realistic.
Well, if you've worked through the tutorial this far, you now have a pencil sketch ready to be turned into a doll base! Congrats!
If your sketch isn't quite what you've envisioned, don't panic! Learning how to draw takes a lot of practice, so your first tries may not be too great. That's okay, nobody is born an artist. My first drawings sucked, too!
So just keep practicing and don't give up. Even if you just spend 10 minutes doodling a day, this will help your drawing skills tremendously!
If you'd like to know more on drawing, I recommend learning from Stan Prokopenko on Youtube: