

Lighting theory
Introduction:
Lighting theory. It sounds very technical and scary... and it may seem like a boring subject. But, it's actually not that hard and it will help your shading tremendously.And, it doesn't only apply to making bases, it also applies to dolls (or drawing and painting, for that matter)!
A common mistake:
First off, I'll show you how NOT to do it.This is what some people do when they shade: they trace the outline with a one-pixel thick line of shading. After that, they pick a lighter color and repeat the process several times.
Let's apply this technique to a ball and see how it looks.
![]()
Now, be totally honest. Does this really look like a ball to you? It's not very realistic, is it?
There are several glaring errors with this ball:
-The light source is weird
A ball would never be lit this way, unless there's a tiny spotlight pointed straight at the middle of the ball. But what if you applied this to a whole doll? It would look like every section of the doll has it's own tiny spotlight. Now that would be weird, right?-The highlight shape is wrong
A ball is perfectly round, obviously. So, any highlight on it would also have a round shape. But with this shading method, you don't have any control over the shape of the highlight. On this ball, the highlight ended up squarish. It's unrealistic, but it's also just plain ugly.

-The shading isn't smooth
With pixel art, you are going to have jagged outlines. There's no escaping this. But, if you follow the outline exactly with your shading, you're going to transfer the same jaggedness throughout your whole shading!This creates the optical illusion of lines running through your shading. If you look closely, you can see dark lines forming a cross shape on this ball. Also, you can see lighter lines forming a star shape on it.

But, how can we do this better? The answer is... lighting theory!
The rules of lighting:
On the right I pixelled a new ball with lighting theory applied to it. It looks better, no? I used less colors than on the first ball and there are bigger areas of the same color... still, it looks smoother and more realistic.
![]()
Here's how it works:
- Any surface that faces the light will be lit, provided there is no other object blocking the light.
- Any surface that faces away from the light will be in shadow.
- Any surface that faces the light directly will get the brightest highlight.
Now that sounded rather technical, so I'll further explain with a picture.
We can apply the same rules to different shapes. Here are some examples, all lit from the same direction as the ball in the previous example.

It's a good idea to practice shading these shapes. It might be easier just to do it on paper, with a pencil. They don't have to be pretty, as long as they get the point across.
What would they look like if the light came from a different direction? If you have trouble visualizing this, find some objects around the house, take them to a dark room and shine a flashlight on them.
Reflected light:
Now that we know how these basic shapes are lit, here's a slightly more advanced trick. When light hits a surface, it doesn't only light it. The light also bounces back.So, it could happen that light bounces off into areas that normally would be in shadow. When we apply this to our basic shapes, you can see a thin highlight glinting off the surface on the shadowy side.
This is a technique you don't HAVE to use, but it adds realism... especially for shiny surfaces.
Complex objects:
So far, we've been only been shading very basic shapes. Still, it's very important that you learn how to shade these objects from all angles and under different lighting conditions.Now you may think: "I don't want to shade these boring shapes, I want to shade dolls and bases!"
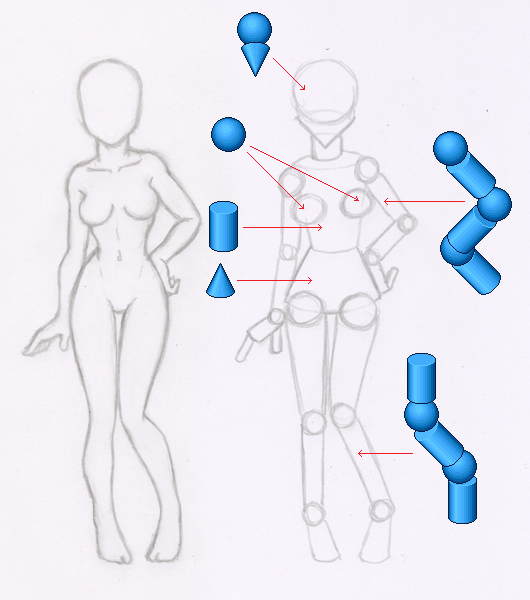
However... even if a shape is really complex, we can break it down into basic shapes! So, if we know the basics, we can apply it to anything we want.
As an example, here's the sketch from the previous chapters, broken down into basic shapes. Ofcourse we could break it down even further, but that's beside the point.
Also, if we break a body down like this, it kinda starts to look like a drawing mannequin. So if you still have trouble picturing where the lights and darks should go, using a drawing mannequin and a flashlight could actually be very helpful.
Now you're all set to start converting your pencil sketch into a pixel masterpiece!