

Drawing the head
Introduction:
In this part of the tutorial I will show you how to sketch a proportional head for your doll base. Most doll bases have a straight on head, so that's what we're going to do here.Step 1:
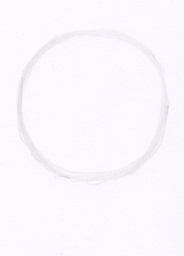
Let's start by drawing a circle. It doesn't have to be perfect... if it's somewhat even, it will do.
Step 2:
Now, to the bottom of the circle, add a wedge-like shape.

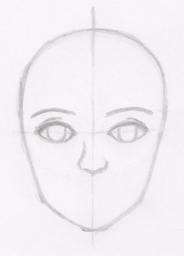
Step 3:
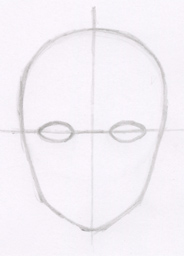
The bottom part of the circle is no longer needed, so I erased it, leaving me with a clean head shape. After that, I drew two guidelines dividing the head in half both vertically and horizontally. This is to make sure to eyes end up in the right spot.To make the eyes, I drew two little almond shapes on top of the horizontal guide. Keep in mind that the eyes should be an eye's width apart! Also, there's half an eye's width of space between the outer corner of the eye and the side of the head.
Step 4:
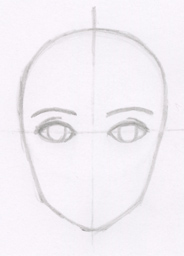
Here, I've added some more details to the eyes. I've drawn a small curved line just above the eye to create an eyelid. I also made the top lash thicker. Then, I drew the shape of the iris. It touches both the top and bottom eyelash.Lastly, I drew in some eyebrows. These will help us to place the next facial feature.
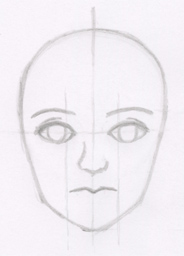
Step 5:
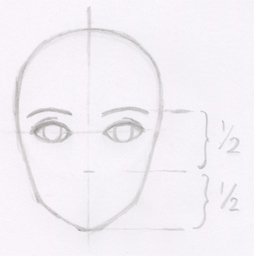
Now, I've drawn in some more guidelines, so we can draw the nose. The nose should end halfway the eyebrows and the chin. I drew in a little dash to mark the spot.
Step 6:
I used the guidelines from the previous step to place the nose. I didn't put outlines all around it, just the bottom part. Otherwise, it would stand out too much. Feel free to experiment with the size and shape, though. No two noses are the same!
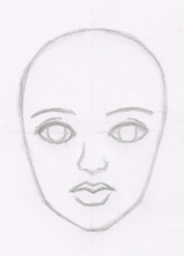
Step 7:
Now, a bit below the nose, draw in the opening of the mouth. If you draw some guidelines going straight down from the sides of the iris, they should end up at the corners of the mouth.
Step 8:
I drew in a line to indicate the upper lip and another one to create to bottom lip. You don't have to draw them exactly like mine, lips come in all shapes and sizes. Experiment!You no longer need the guidelines, so you can erase them now.
Step 9:
Now we have a face, but we still need ears. I drew in some more guidelines to place them correctly. The top of the ear should be at brow height and the bottom of the ear should line up with the bottom of the nose.
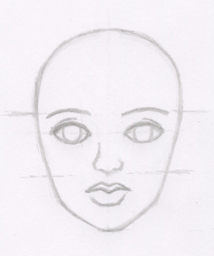
Step 10:
Time to draw the ear shapes! Don't make them stick out too much, or your character will look silly.
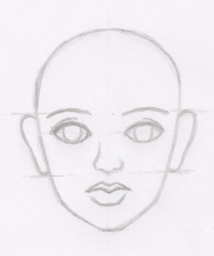
Step 11:
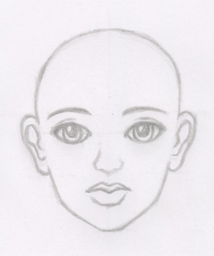
And now for some final touches!I erased the harsh lines between the head and the ears and added an inner ear with a single line. For dolls, that's all you'll need. I also added in the pupils, but I left one spot white for the highlight. Lastly, I darkened some of the lines.
There, the head is done!
If you feel your head didn't come out as good as you liked, don't give up yet! Just go over the steps again and draw a few more heads. It all comes with practice. And before you know it, you'll be drawing awesome heads!
Now, these are just the very basics of drawing a head, but there's ofcourse more to know... for instance, how to draw different views! If you'd like to delve deeper into drawing, the best thing you can do is to buy or borrow a drawing book. Also, these sites might be helpful: